Monday, December 20, 2010

Shortbread

"Christmas cookies and happy hearts, this is how the holiday starts." Unknown

Hello followers, isn't today's quote super cheesy and fun?! Christmas is almost here!
Well, last week homemade butter was on the menu. As soon as I made it and realized how close to the holidays we were, I only had one thought... Shortbread. I mustn't be the only who thinks this way, for my cousin has Sheri requested a shortbread recipe! Ha! Never making shortbread before, I decided to make it a family affair and ask my Grandparents. My Grandma's recipe is easy and straightforward and yes, it's got a lot of butter in it! The history of shortbread goes back about a thousand years in Scotland. There are different shapes that are traditional: a molded round that is cut into triangles ('petticoat tails'), small round biscuits or fingers (rectangles). Today I am making 'petticoat tails,' a treat enjoyed by Queen Mary I. Originally the molds were made of wood and had notches carved into the edges to represent the sun, but today, the unglazed clay molds are most popular. I bought one recently with a thistle pattern and have been eager to use it! Let's get started!


Simple and Tasty Recipe:


(makes one clay mold, plus a dozen cookies or about 4 dozen cookies)

1 cup + 2 tbsp butter
3/4 cup icing sugar
1 tsp vanilla
pinch of salt
2 1/2 cup all purpose flour

.preheat the oven to 325 degrees
.with an electric mixer or wooden spoon, beat or cream the butter and sugar until fluffy
.add in the rest of the ingredients and knead lightly until it comes together (it's a bit crumbly, but the butter will soften with the heat from your hands)
.either: dust your clay mold with some icing sugar, then press the dough into the mold until it is full and bake for about 30 to 35 minutes until it is evenly browned. Allow to cool for 10 mins, turn upside down onto a cutting board and tap the mold to release the shortbread. Cut into wedges while it's still warm.
or...
Roll out the dough to 1 cm or 2 cm thick, cut into fingers or any other shape, prick with a fork, place on an ungreased tray and bake for 20 to 30 mins, until the shortbread is lightly browned.
or...
Divide the dough into 4 pcs, place each on a large pc of wax paper and roll into a log with your hands until about 5 cm thick. Wrap in the wax paper and place in the freezer for an hour. Remove from the freezer, sit for 5 mins, cut into 1 to 2cm slices, place on an ungreased tray and bake for 20 to 30 mins until lightly browned, enjoy!
Once the shortbread cookies are cooled, put into an airtight container and they will be ready to go for Christmas! Don't you just love this time of year? The snow, the food, the family get togethers! I hope that you all spend the holidays with the people you love and as for the loved ones we are missing, we will have them in our hearts. 2010 has had it's ups and downs and I hope that 2011 will be a good one for us all. Merry Christmas and Happy New Year! Till then my followers, when I will be back with more exciting culinary adventures!

Saturday, December 11, 2010

Homemade Butter

"Butter makes the world go 'round!" Me

Hiya my loyal followers!
As promised, I am back this week with an adventure that could rival any of our culinary adventures thus far. Homemade butter! Yum! I absolutely adore butter and I'm so happy that my sweetie Kevin does as well. As a special treat last spring, I decided to make butter for Kev and see if he could taste any difference between mine and store bought. I got down to business and did a bit of research. I remembered making butter in grade 2 as a class project, but hadn't made it since then and to tell you the truth, my memory isn't that great. Well, it turned out to be so simple and so, so tasty, that every now and then, I make us some! Butter is made by agitating cream enough that it separates. Basically, the fatty bit is the butter and the liquid is the butter milk. I can understand how butter must have been discovered all those thousands of years ago... A person would fill a vessel with goat or sheep's milk and go for a long walk or horseback ride. By the time their travelling was done, the milk would have been shaken around enough to separate and the butter would be ready. Eaten by the poorest of farmers, the ancient Greeks saw butter as food fit for barbarians. Not until northern Europeans began making butter with cow's milk, did it become accepted and enjoyed across Europe. And, may I say, I am so happy it caught on! Today I will do something a bit different with my blog and show the step by step method for making butter. All I am using is a jar with a good fitting lid, but don't worry, I will also have instructions for an electric mixer!

Simple and Tasty Recipe:

Homemade Butter
(makes about 1/3 cup)

1 cup 35% cream (I prefer organic...), at room temperature
1/8 to 1/4 tsp sea salt (optional)

.pour the cream into a jar with a good, tight fitting lid
.shake for about 5 to 7 mins until there is a lot of sloshing going on, this means the butter has separated from the butter milk (or place the cream into a bowl and use you electric mixer for about 5 mins)
.dump the butter and butter milk into a fine mesh sieve sitting over a bowl, put the strained butter milk aside in a container to drink or keep for cooking
.rinse the lump of butter under very cold water in a bowl, break it up with your hands or a spoon until the butter milk is all out and the water is clear
.place the butter onto a bowl and squish any excess water out with a spoon (I dab any water droplets with a paper towel), stir in the salt
.place the butter into a container with a lid or a small bowl with plastic wrap and refrigerate, it will stay fresh for about a week, enjoy!


You will be surprised by how easy it is to make butter! It gets a bit tough to shake the cream through the whipped stage and into the separated product, but it is well worth it. Homemade butter has a lighter and sweeter flavour than store bought. As usual, I hope you try out my recipe and let me know how it goes. Next week I will be back with a festive recipe, since the holidays are right around the corner. Hint: it's made with butter! Ha! Bye for now...

Saturday, December 4, 2010

Whole Wheat Bread

"If thous tastes a crust of bread, thou tastest all the stars and all the heavens." Robert Browning


Good day, my fine followers!
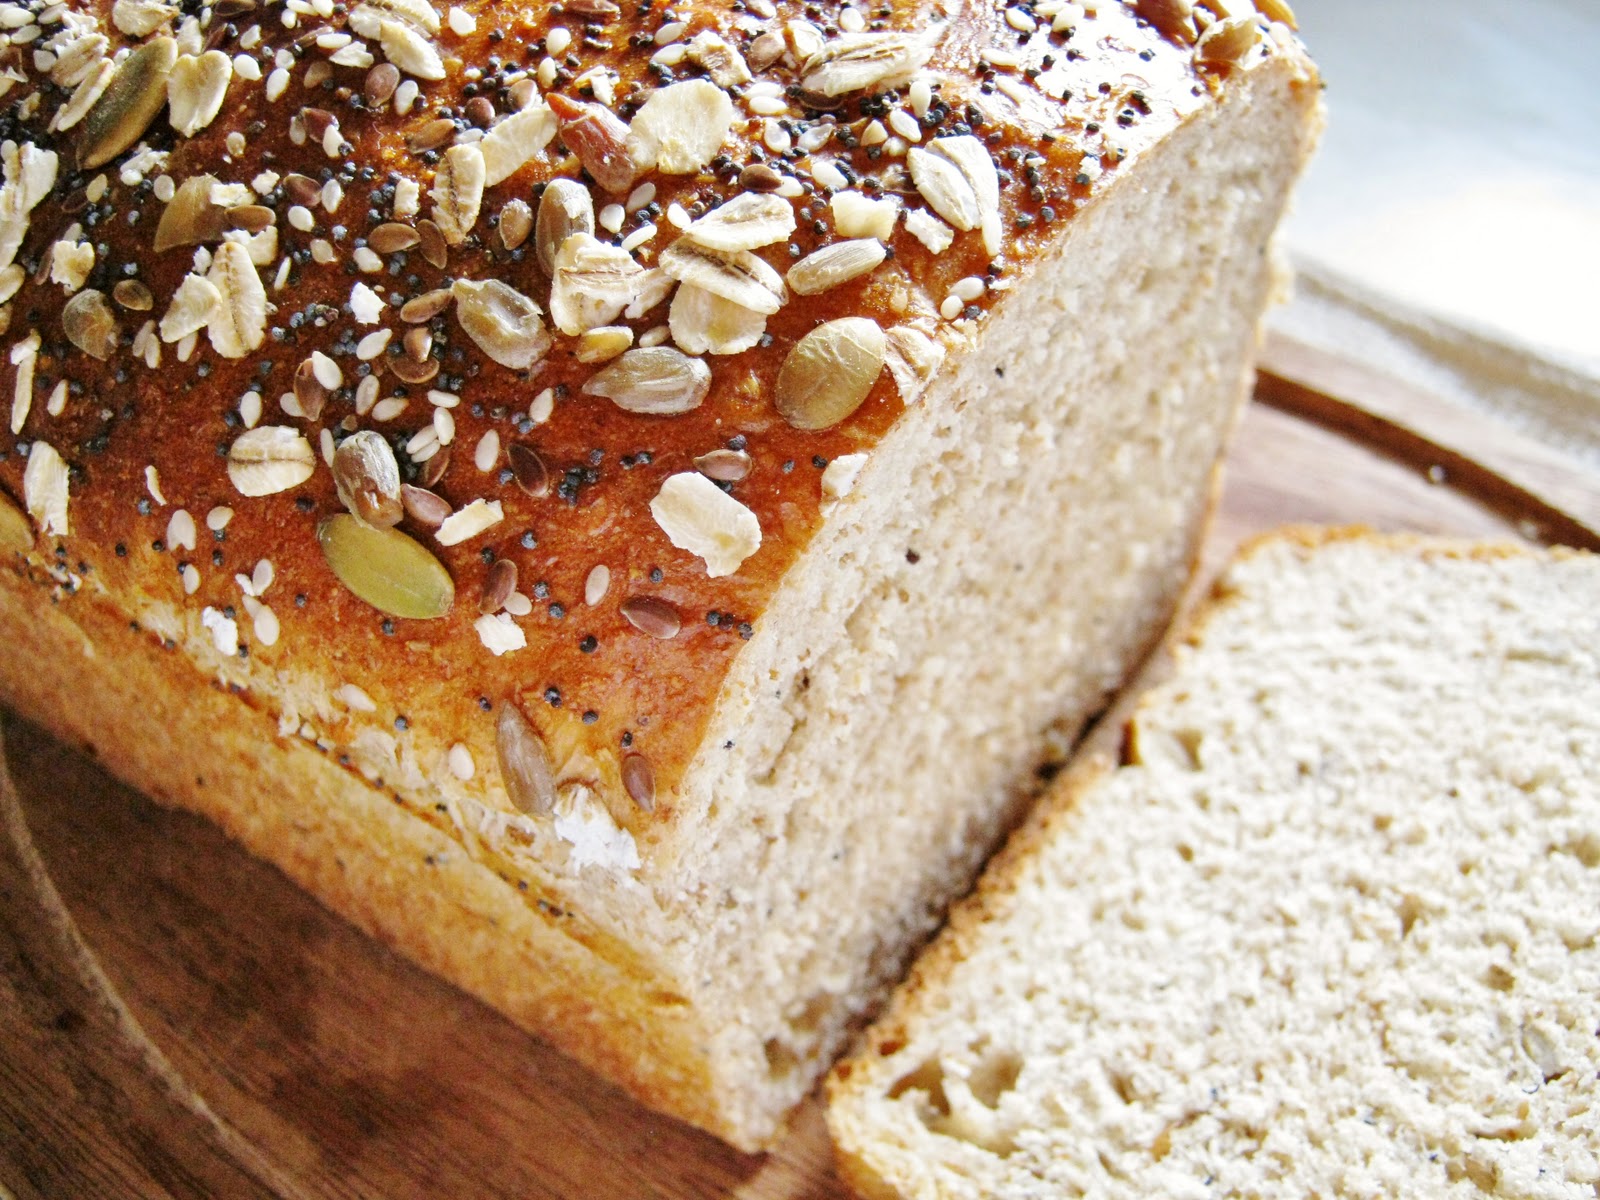
Well, before we get to this week's recipe, I have some updating to do! First of all, the 'Cottage Life' show last weekend was great! Jane Rodmell and I did four cooking demonstrations and I must say, we did a very good job! Our morning demos were for a one skillet brunch of potato and sausage hash topped with eggs and the afternoon demos were for chocolate, orange and walnut phyllo bundles. All in all, it was a fun time as always and the bonus was that Jane and I had our photo in the program! Ha! Also, the winter edition of 'Sideroads of Halton Hills' magazine came out on Tuesday! Yippy! As you can see below, my recipes were a layered cheese terrine, roasted squash with brown butter and sage and butter tarts with cranberries and walnuts (if you click on the photo, it will enlarge and the recipes are easily read! Thank you again Michelle for the great scanning job!). Well, onto today's subject matter: bread. A little while ago, my friend Dana requested a recipe for bread. Something 'wholesome' she said. No problem! Bread is not hard to make, but it does take a bit of elbow grease and some time. Bread, in one form or another, has been around just about forever. Modern bread making was first practised by the ancient Egyptians about three thousand years ago. Next, the Greeks continued to hone the methods and ingredients, until leavened bread was being made and sold across Europe, followed by the rest of the world. Often referred to as the 'staff of life,' bread has been eaten out of necessity, used in religious ceremony and most recently, celebrated as an artisan craft. Consumed at any or all meals, bread is extremely versatile and can be treated in a countless number of preparations. For Dana's bread, I have decided to use a simple country recipe. Made with ingredients you would find on the farm, I have added some rolled oats and seeds to make it a little more 'wholesome.' I hope you like it, Dana!


Simple and Tasty Recipe:

Whole Wheat Bread
(makes 2 large loaves (tin size 11cm x 21cm or 4 1/2 x 8 1/2 inches))

2 3/4 cups milk, warmed
1/4 cup honey
1 package of dry active yeast
5 1/2 cups whole wheat flour
1 tbsp sea salt
2 large eggs, room temperature (1 for the bread, 1 for the egg wash)
3 tbsp butter, softened
about 1 cup unbleached flour (for kneading)
3/4 cup rolled oats and mixed seeds: I used pepitas (hulled pumpkin seeds), sunflower, poppy, sesame and flax seeds (1/2 cup of this goes in the bread, 1/4 is for the top of the bread)

.in a large bowl combine the milk and honey, stir with a wooden spoon until dissolved, sprinkle in yeast, stir to dissolve and set aside for about 5 to 10 minutes until frothy
.add in 3 1/2 cups of flour and stir vigorously for 1 minute, cover with plastic and set aside in a warm place for 30 mins (I like to use a clean, recycled plastic bag for this recipe...)
.next, stir the salt, 1 egg another cup of flour into the sponge
.stir in half the butter with a half cup of flour until the lumps are out (this is when a little elbow grease is needed!), add the remaining butter and the last half cup of flour and stir again until lump free (if I can do it, so can you!!), then finally stir in 1/2 cup of the rolled oats and mixed seeds
.turn the sticky dough out onto a flour covered surface and knead for about 10 mins, adding flour as you go so it won't stick to the counter or your hands, shape into a a nice rounded ball (a.k.a. blob)
.wash out your large bowl, lightly oil it and place the kneaded dough ball inside, cover with plastic and put in a warm place until it has doubled in size (about an hour), meanwhile lightly butter two loaf pans
.punch down the leavened dough, turn out onto a floured surface, knead for a few minutes, mould into loaf shapes and place into your prepared loaf tins, cover with plastic set aside in a warm place until doubled in size again (about another hour)
.turn your oven to 375 degrees and beat the remaining egg in a small bowl or cup
.brush the tops of the loaves with the egg wash and sprinkle over the remaining 1/4 cup of rolled oats and mixed seeds (you could make slash marks across the top of your bread if you like)
.bake 40 to 45 mins until nicely browned
.remove the bread from the tins (when tapped on the bottom a hollow sound will be heard) and cool on a rack before slicing, enjoy!
Making bread form scratch without a bread machine is a labour of love, but a job that will leave one feeling very proud of oneself! With bread that tastes this good and costs so little to make, why go back to store bought?! Of course, any of the seeds I used can be substituted with your favourites. Nuts could also be used. Or, of course, they could all be left out! It's up to you, my crafty followers! This is the perfect time of year to make bread, just the smell alone that will be left wafting your your home is reason enough to make it! I hope this 'wholesome' bread is what you were expecting Dana, I promise it's delicious! Now, make sure to store your loaves in a sealed plastic bags to keep it fresh. Freezing the bread is also fine. Now followers, you better have some bread handy next week, for I will be making bread's best friend... Come on, you know who it is! That's right, butter. Yummy, homemade butter. It's gonna be a good one! Bye for now!

Here are the links to the 'Cottage Life' magazine recipes that Jane and I demonstrated :
http://www.cottagelife.com/index.php?ci_id=41443&la_id=1
http://cottagefeast.cottagelife.com/2010/11/19/chocolate-orange-bundles-recipe/